Premium WordPress Themes

Tampilkan postingan dengan label Gadget. Tampilkan semua postingan

Kamis, 03 November 2011

How to install Windows XP (Part 4)

Step 19 - Finally Windows will start and present you with a Welcome screen. Click next to continue.
Windows XP Screenshot - Click to enlarge
Step 20 - Choose 'help protect my PC by turning on automatic updates now' and press next.
Windows XP Screenshot - Click to enlarge
Step 21 - Will this computer connect to the internet directly, or through a network? If you are connected to a router or LAN then choose: 'Yes, this computer will connect through a local area network or home network'. If you have dial up modem choose: 'No, this computer will connect directly to the internet'. Then click Next.
Windows XP Screenshot - Click to enlarge
Step 22 - Ready to activate Windows? Choose yes if you wish to active Windows over the internet now. Choose no if you want to activate Windows at a later stage.
Windows XP Screenshot - Click to enlarge
Step 23 - Add users that will sign on to this computer and click next.
Windows XP Screenshot - Click to enlarge
Step 24 - You will get a Thank you screen to confirm setup is complete. Click finish.
Windows XP Screenshot - Click to enlarge
Step 25. Log in, to your PC for the first time.
Windows XP Screenshot - Click to enlarge
Step 26 - You now need to check the device manager to confirm that all the drivers has been loaded or if there are any conflicts. From the start menu select Start -> Settings -> Control Panel. Click on the System icon and then from the System Properties window select the Hardware tab, then click on Device Manager.
Windows XP Screenshot - Click to enlarge
If there are any yellow exclamation mark "!" next to any of the listed device, it means that no drivers or incorrect drivers has been loaded for that device. In our case we have a Video Controller (VGA card) which has no drivers installed.
Your hardware should come with manufacturer supplied drivers. You need to install these drivers using the automatic setup program provided by the manufacturer or you need to manually install these drivers. If you do not have the drivers, check the manufacturers website to download them.
To install a driver manually use the following procedure:
(a) From the device manager double click on the device containing the exclamation mark.
(b) This would open a device properties window.
(c) Click on the Driver tab.
(d) Click Update Driver button. The Wizard for updating device driver pops up as shown below:
Windows XP Screenshot - Click to enlarge
You now get two options. The first option provides an automatic search for the required driver. The second option allows you to specify the location of the driver. If you don't know the location of the driver choose the automatic search which would find the required driver from the manufacturer supplied CD or Floppy disk. Windows would install the required driver and may ask you to restart the system for the changes to take affect. Use this procedure to install drivers for all the devices that contain an exclamation mark. Windows is completely setup when there are no more exclamation marks in the device manager.

How to install Windows XP (Part 3)

Step 11 - After the setup has completed copying the files the computer will restart. Leave the XP CD in the drive but this time DO NOT press any key when the message "Press any key to boot from CD" is displayed. In few seconds setup will continue. Windows XP Setup wizard will guide you through the setup process of gathering information about your computer.
Windows XP Screenshot - Click to enlarge
Step 12 - Choose your region and language.
Windows XP Screenshot - Click to enlarge
Step 13 - Type in your name and organization.
Windows XP Screenshot - Click to enlarge
Step 14. Enter your product key.
Windows XP Screenshot - Click to enlarge
Step 15 - Name the computer, and enter an Administrator password. Don't forget to write down your Administrator password.
Windows XP Screenshot - Click to enlarge
Step 16 - Enter the correct date, time and choose your time zone.
Windows XP Screenshot - Click to enlarge
Step 17 - For the network setting choose typical and press next.
Windows XP Screenshot - Click to enlarge
Step 18 - Choose workgroup or domain name. If you are not a member of a domain then leave the default settings and press next. Windows will restart again and adjust the display.
Windows XP Screenshot - Click to enlarge

How to install Windows XP (Part 2)

Step 7 - You will be presented with the End User Licensing Agreement. Press F8 to accept and continue
Windows XP Screenshot - Click to enlarge
Step 8 - This step is very important. Here we will create the partition where Windows will be installed. If you have a brand new unformatted drive you will get a screen similar to below. In our case the drive size is 8190MB. We can choose to install Windows in this drive without creating a partition, hence use the entire size of the drive. If you wish to do this you can just press enter and Windows will automatically partition and format the drive as one large drive.
However for this demonstration I will create two partition. The first partition will be 6000MB (C: drive) and second partition would be 2180MB (E: drive). By creating two partition we can have one which stores Windows and Applications and the other which stores our data. So in the future if anything goes wrong with our Windows install such as virus or spyware we can re-install Windows on C: drive and our data on E: drive will not be touched. Please note you can choose whatever size partition your like. For example if you have 500GB hard drive you can have two partition of 250GB each.
Press C to create a partition.
Windows XP Screenshot - Click to enlarge
Step 8 - Windows will show the total size of the hard drive and ask you how much you want to allocate for the partition you are about to create. I will choose 6000MB. You will then get the screen below. Notice it shows C: Partition 1 followed by the size 6000 MB. This indicates the partition has been created. We still have an unpartitioned space of 2189MB. Next highlight the unpartitioned space by pressing down the arrow key. Then press C to create another partition. You will see the total space available for the new partition. Just choose all the space left over, in our case 2180MB.
Windows XP Screenshot - Click to enlarge
Step 9 - Now you will see both partition listed. Partition 1 (C: Drive) 6000MB and Partition 2 (E: Drive) 2180MB. You will also have 8MB of unpartitioned space. Don't worry about that. Just leave it how its is. Windows normally has some unpartitioned space. You might wonder what happened to D: drive. Windows has automatically allocated D: drive to CD/DVD-ROM.
Select Partition 1 (C: Drive) and press Enter.
Windows XP Screenshot - Click to enlarge
Step 10 - Choose format the partition using NTFS file system.This is the recommended file system. If the hard drive has been formatted before then you can choose quick NTFS format. We chose NTFS because it offers many security features, supports larger drive size, and bigger size files.
Windows XP Screenshot - Click to enlarge
Windows will now start formatting drive C: and start copying setup files as shown on the two images below :
Windows XP Screenshot - Click to enlarge

How to install Windows XP (Part 1)

This procedure demonstrates how to install Microsoft Windows XP Professional. The procedure to install Windows XP home edition is very similar to the professional edition. Since Windows XP Pro is more advanced operating system, it will be used to demonstrate the installation procedure.
The best way install Windows XP is to do a clean install. It is not difficult to perform a clean installation. Before you perform the installation I recommend that you check Windows XP Compatibility List to ensure that your hardware is supported by XP. If your hardware is not on the compatibility list you can check your hardware manufactures website to download the drivers for Windows XP. Save all the necessary drivers onto floppy disks or CD before you start the installation.
All versions of Windows XP CD are bootable. In order to boot from CD/DVD-ROM you need to set the boot sequence. Look for the boot sequence under your BIOS setup and make sure that the first boot device is set to CD/DVD-ROM. You can then perform the following steps to install Windows XP:
Step 1 - Start your PC and place your Windows XP CD in your CD/DVD-ROM drive. Your PC should automatically detect the CD and you will get a message saying "Press any key to boot from CD". Soon as computer starts booting from the CD your will get the following screen:
Windows XP Screenshot - Click to enlarge
Step 2 - At this stage it will ask you to press F6 if you want to install a third party Raid or SCSI driver. If you are using a an IDE Hard Drive then you do not need to press F6. If you are using a SCSI or SATA Hard drive then you must press F6 otherwise Windows will not detect your Hard Drive during the installation. Please make sure you have the Raid drivers on a floppy disk. Normally the drivers are supplied on a CD which you can copy to a floppy disk ready to be installed. If you are not sure how to do this then please read your motherboard manuals for more information.
Windows XP Screenshot - Click to enlarge
Step 3 - Press S to Specify that you want to install additional device.
Windows XP Screenshot - Click to enlarge
Step 4 - You will be asked to insert the floppy disk with the Raid or SCSI drivers. Press enter after you have inserted the disk.
Windows XP Screenshot - Click to enlarge
Step 5 - You will see a list of Raid drivers for your HDD. Select the correct driver for your device and press enter.
Windows XP Screenshot - Click to enlarge
Step 6 - You will then get a Windows XP Professional Setup screen. You have the option to do a new Windows install, Repair previous install or quit. Since we are doing a new install we just press Enter to continue.

How to install Ubuntu

The Ubuntu installation guide: last updated September 2009
Table of contents
When it comes to installing popular Linux flavour  Ubuntu, there are so many useful snippets of information on blogs and guides all over the internet. If you Google “How to install Ubuntu”, you’ll see what I mean.
For an Ubuntu beginner or curious Windows intermediate user however, there’s no single, simple source of information when it comes to trying out your first Ubuntu installation. One thing I have noticed is that there’s a lot of technical jargon and sometimes unnecessary terminal commands in lengthy forum posts, but no simple “how to” guides, which I think  might put some people off! A shame, when you think about how easy Ubuntu is to install, use and tweak to look really cool!
This post will talk you through your first Ubuntu installation, hopefully teaching you everything you need to know to give Ubuntu a try without breaking or removing your existing Windows installation. The end result will be a “vanilla” Ubuntu Installation running simultaneously with your Windows installation using either the GRUB bootloader, or WUBI, depending on how far you’d like to go on your first Ubuntu experience.
I hope my guide makes installing Ubuntu an enjoyable, simple experience. By the end of the guide you should have a dual boot Windows / Ubuntu machine that happily plays music, video, and acts as a perfectly usable home office computer with Openoffice 3.0. For the really adventurous you could even run Windows XP inside Virtualbox, which is linked to later on in the guide.  The Ubuntu OS is unique and seriously cool, so, enjoy the trip.
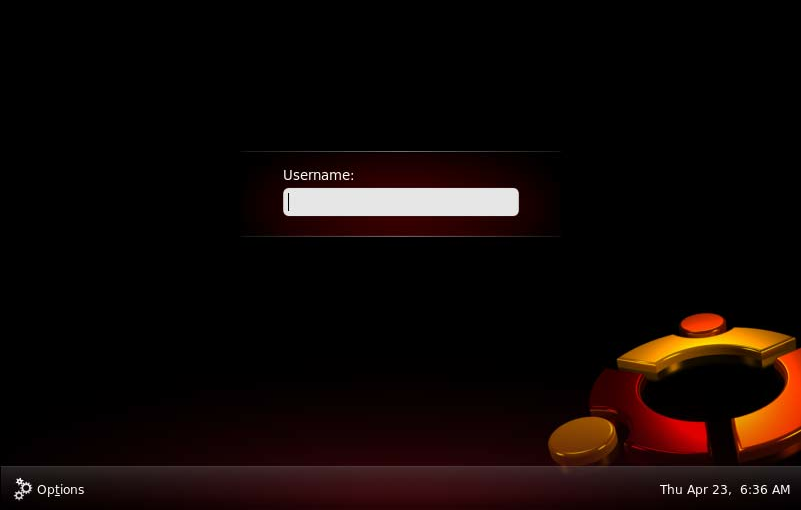
The all new Ubuntu login screen
If you’re planning on installing the latest version of Ubuntu (Jaunty Jackalope 9.04) you can install Ubuntu straight from the CD inside Windows or from a USB stick and the install process can takes care of formatting your hard drive partition for you. You might not yet have a spare partition to do this, so I’ve covered shrinking your existing Windows partition to make space for Ubuntu here.
How to install Ubuntu from CD
1) Download the Ubuntu ISO from http://www.ubuntu.com/getubuntu/download and save to your desktop
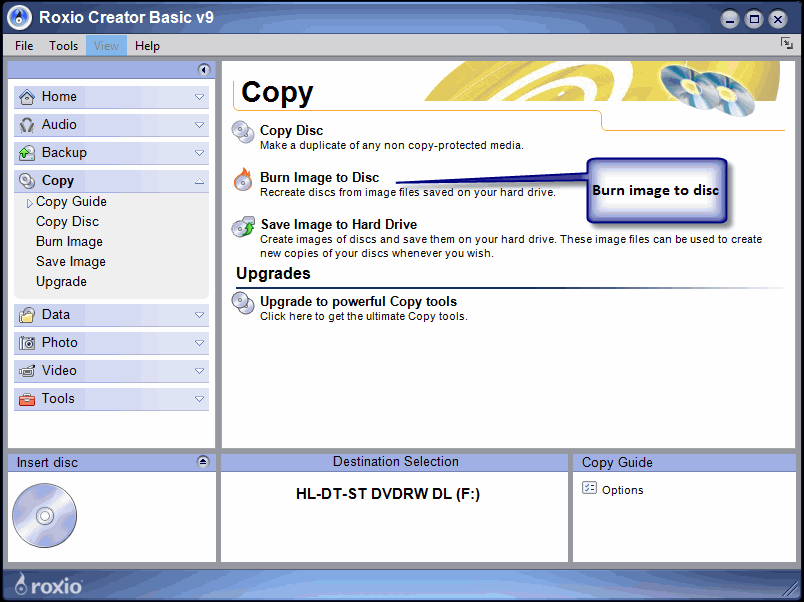
2) Burn the ISO image to a blank CD using Roxio CD creator or similar:
burn a disc image with roxio
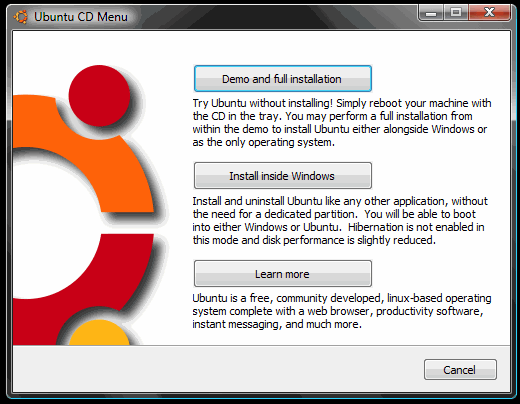
3) Run the CD from “My Computer” – the CD should ask permission to run at which point you’ll see this option screen:
Install Ubuntu with Wubi
4) If you’d like to install Ubuntu using Wubi, select “install inside Windows” and follow the instructions. Installing with WUBI is ideal for a first taste of Ubuntu as you can remove from add/remove programs in Windows later on. This install process is really easy but you don’t get the same performance as if Ubuntu had a separate partition running on its EXT3 file system. The following screens are all based on the Wubi installer process, so you can follow the rest of the instructions below.
If you’d like to install Ubuntu separately to Windows, then skip to point 7) below.
Here’s what you see next:
Wubi installer
If you’ve got the space on your hard drive, go for 30gb or more for the installation size.
5) Now configure your installation using the simple settings options. You can specify the location of the Ubuntu installation on your Windows partition, the size of the Ubuntu installation, the Ubuntu flavour (Ubuntu, Kubuntu, Xubuntu, etc), your preferred language, and a username and password for the Ubuntu system.
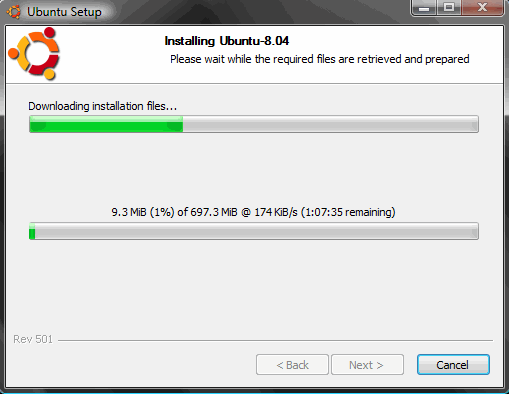
When you click install, you’ll see this screen:
As soon as the files have finished downloading, you’ll see this:
Time to reboot Wubi installer
6) That’s it! Click reboot now, and select “Ubuntu” on the startup screen. You now have a fully functional dual boot Windows / Ubuntu machine.
Install Ubuntu on a single (EXT3) partition (separately to Windows)
7) Click “Demo and full installation” and your computer will restart and boot into Ubuntu.
It’s worth saying at this point that you’re about to install Ubuntu on an entirely separate drive partition. That means, you need to make sure you have enough space on your computers hard drive to accomodate the new setup. Keir Thomas found that a partition less than 4gb would lead Ubuntu to crash during install in his first look at Ubuntu 9.04 over at Lifehacker.
Here’s a guide on how to resize or shrink your Windows Vista partition. Follow those instructions before you reboot into the live version of Ubuntu and you’ll have a really easy time during the following steps. Maybe you’d like to install from a USB? Let’s have a quick look at the process of installing from a USB before we continue:
Here’s how to install Ubuntu on a USB drive from Windows Vista:
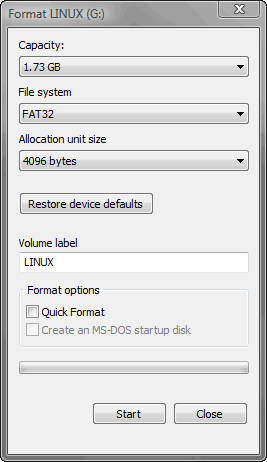
8) Format your USB stick with a FAT32 partition from Windows. You can get to the format dialogue by opening My Computer and right mouse clicking the removable drive icon. Click “Format” and follow the settings in the image below. You need a minimum 2gb USB stick.
format your USB drive in Windows Vista
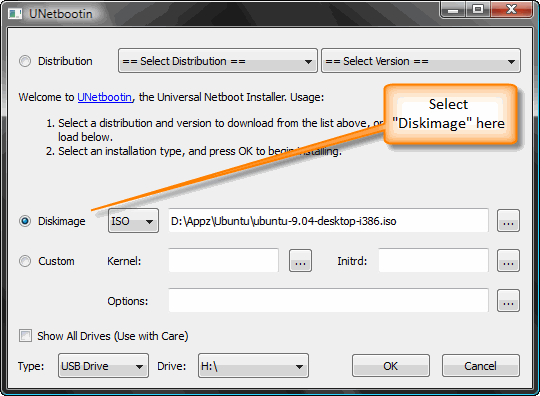
9) Download UnetBootin. UNetbootin allows for the installation of various Linux/Ubuntu distributions to a partition or USB drive, so it’s no different from a standard install, only it doesn’t need a CD. The coolest thing about the application is that it’s a “portable” app. You don’t need to install it into Windows meaning UNetbootin will run on your Windows PC without “admin” privileges.
The new version of Ubuntu isn’t in the Distribution list supplied with UNetbootin yet, so use the downloaded Ubuntu ISO from earlier on. Add the ISO using the “Diskimage”, make sure your USB drive is selected below and click OK.
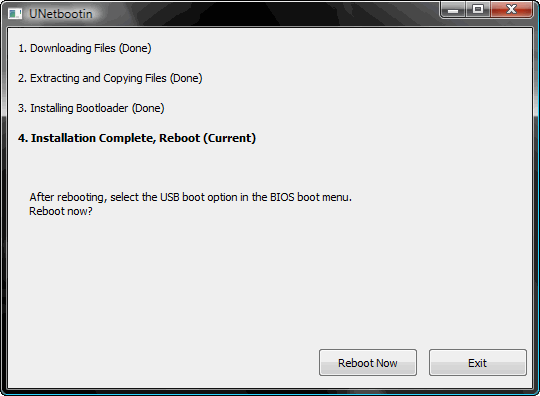
The ISO transfers to the USB pretty quickly, so soon after you click OK you’ll see this screen:
unetbootin complete
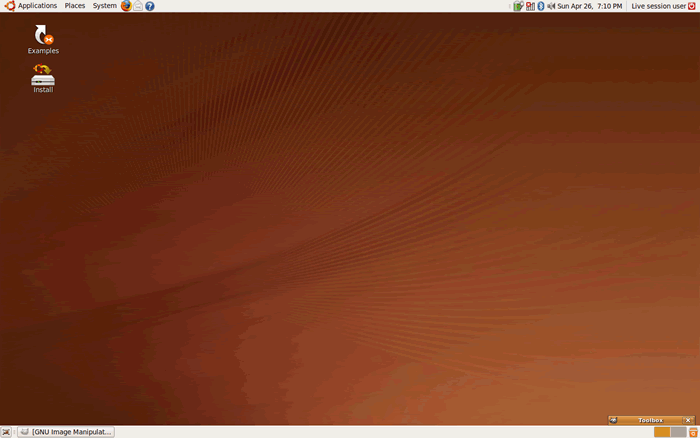
10) That’s it – when the installation process is complete, restart your computer and make sure it’s set up to boot from USB. On my HP Laptop, pressing F9 on the boot screen shows a boot order menu. Selecting “USB Hard Drive” follows a black screen, an Ubuntu logo, and finally, your new Ubuntu desktop appears.
Completing your Ubuntu installation, step by step
Installing Ubuntu is so easy that it requires very little effort past this point. If you’ve managed to repartition your hard drive and restart your computer you’ll sail through the next few steps:
11) Click “install” on the live desktop (top left)
vanilla Ubuntu desktop
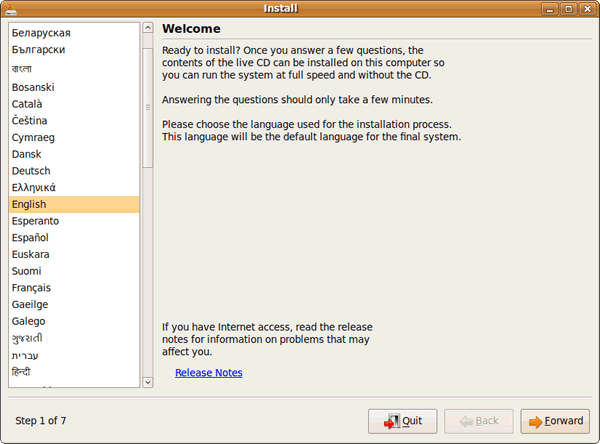
12) Choose your language in the welcome screen
welcome1
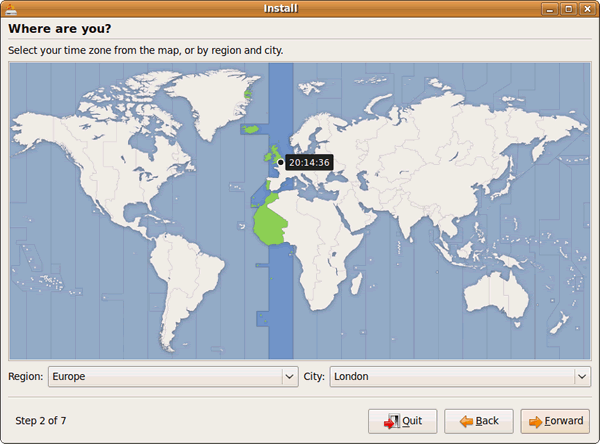
13) Choose your location
Choose location
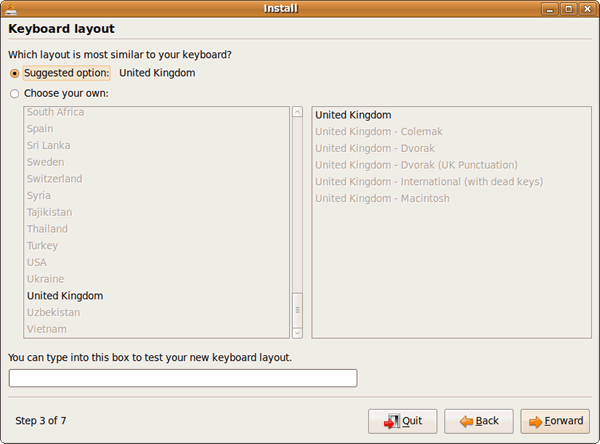
14) Choose your keyboard layout
welcome31
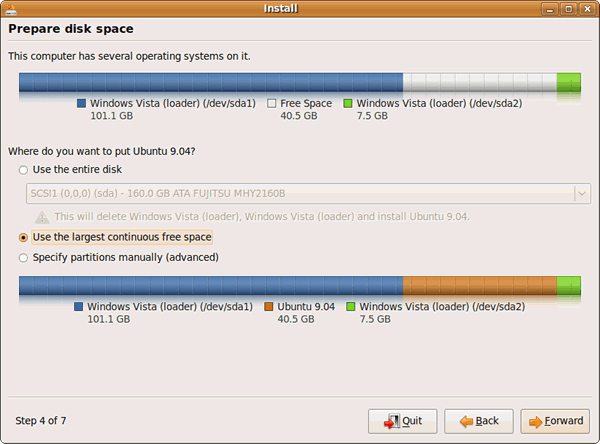
15) Set up your disk partition. This is probably the most “technical” part of the installation. When I shrunk my Windows Vista drive volume, I never formatted the new partition, which means the “use the largest continuous free space” option works nicely:
Set up a disk partition for Ubuntu
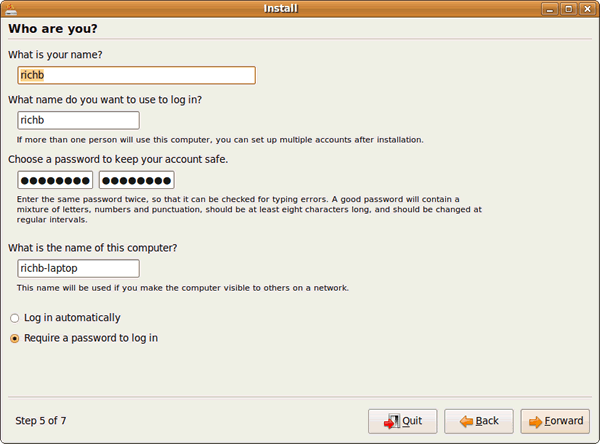
16) Choose your username and password:
Choose your Ubuntu Password
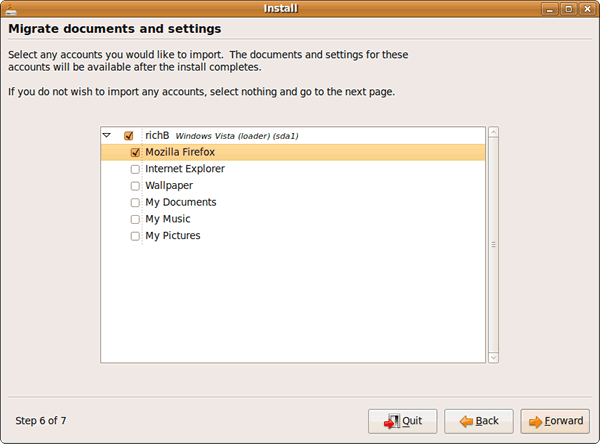
17) Migrate your Windows documents and settings
Migrate your Windows settings
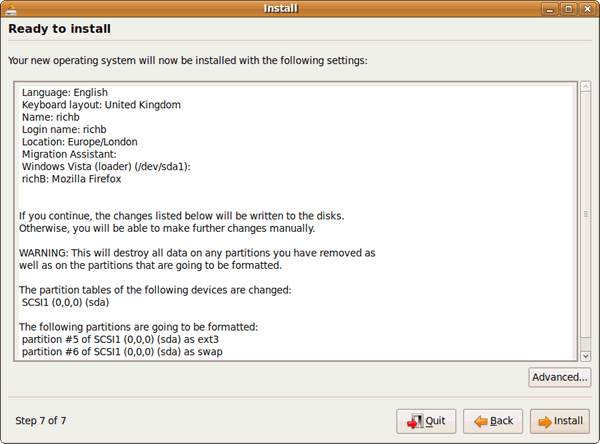
18) You’re now ready to install your new Ubuntu installation
Ready to install
19) When the installation has finished, restart your computer (you’ll be instructed to remove your cd rom or USB drive). You’re now ready to begin using Ubuntu!
Useful tips and resources for Ubuntu
Over the months, I’ve compiled a number of useful tips and hints to get you started in using your new operating system. Here’s a few that people have found most useful:
When you first login you’ll notice the system beep is a little annoying. Here’s how to turn it off. Having problems setting up your wireless network? Use this guide to set it up. Want to run Office 2007 or Windows XP from inside Ubuntu? Use this guide to install Virtualbox. Want to have that amazing 3d cube desktop? You’ll need to install Compiz. Want to make your installation look absolutely amazing? Check this post for a beautifully minimalist Ubuntu desktop powered by Conky. Finally, why not try installing boxee inside Ubuntu to watch a lot of great, free TV!
Ubuntu is a brilliantly simple, easy to use, free and powerful operating system. I hope this guide helps you get on your way. Any feedback? Leave comments below.